Showing posts with label Sweet. Show all posts

Wednesday, 7 April 2010

Lemon Squares

This is a really quick and easy food processor recipe, but it does mean that I have naff all in the way of "in progress" photos:)


Ingredients

Preheat oven to 180C (350F)

Base

2 cups plain flour
1 cup cold butter, in smallish pieces
1/2 cup icing sugar
1/2 cup coconut - flaked or desiccated

Lemon Layer

1/4 cup plain flour
2 cups white caster sugar
4 large eggs
1/2 cup fresh lemon juice
1 teaspoon baking powder

Greased and lined 13 x 9 x 2 baking pan

Place all the ingredients for the base into the food processor and process until it looks like wet sand. Press the crumb mixture into the base of the pan and bake for 15-20 minutes until the edges are golden brown.

While the base is baking in the oven, put all ingredients for the lemon layer into the food processor and blend for two or three minutes until well combined and to let the sugar begin to dissolve into the eggs and lemon.

Pour the lemon mixture over the base while it's still hot and bake again for 20-25 minutes until the surface of the lemon mixture is crisp and golden. It's easier to do the pouring if you just leave the baking pan in the oven and slide the shelf it's sitting on out of the oven slightly to make it easier to get at, rather than try to carry it back to the oven full of liquid.

Once baked remove the baking pan from the oven and place on a wire rack, then leave the squares in the pan until complete cool and cut into squares ready to serve.


The lemony layer is very like a firm set lemon curd with a very light and crispy topping.

Enjoy

Tuesday, 16 February 2010

Scones

Most of the time I'll admit that when I head into the kitchen to bake something, my only purpose in doing so it to make sure there is something good in the house to eat or to occupy an easily bored four year old. On those occasions I break out the old faithful recipes, the all in one variety which results in a delicious cake or treat without too much effort on my part.

However, I do really love to bake and when the notion takes me and I find myself with an abundance of free time on my hands, second on my list of" must makes" are scones (beaten from the top spot by bread).


Scones are one of my all time favourite things to bake. There's something very comforting in the familiarity and old fashionedness of scones. I make them, just as I was taught, with my hands.


The recipe for a basic scone dough is simple enough and you'll likely have all the ingredients handy. I think this may be a WI recipe, as it is, I found it scribbled in a notebook which belonged to my mother in law.

Ingredients

500g plain flour
1 heaped tsp bicarb
2 tsp cream of tartar
125g cold butter, cut into cubes or dipped in flour and grated a la Delia
35g caster sugar
1 large beaten egg (reserve one tblsp)
250ml milk

Glaze

1 tblsp reserved beaten egg and 1 tblsp milk combined

Oven Temp

220C (425F)

Start by preheating your oven. Sift the flour, bicarb and cream of tartar into a large bowl.

Add the cubed or grated butter to the flour mixture and rub in gently with the fingertips, giving the bowl a quick shake every now and then to raise any lumps of butter to the surface. Once the butter is completely rubbed into the flour (it will have a sandy consistency) stir in the caster sugar.

Next add the beaten egg (remembering to reserve one tablespoon) to the milk, mix to combine and add the milk and egg to the flour mixture in the bowl. Using a blunt knife or palette knife, quickly mix the wet ingredients into the dry.

The dough will be very soft and ever so slightly sticky, but you should still be able to handle it if you move quickly.

Turn the dough out onto a well floured counter top. Flour the palms of your hands or dust the surface of the dough with a little flour and pat it down until your dough it about 2 cm thick.

Flour a 2.5 inch cutter and cut out the scones. You can very gently press the offcuts of this dough together to cut a second batch of scones. I usually get about 20 scones from this recipe.

Place the scones about 2 inches apart on a floured cookie sheet and brush the tops with the glaze. You can also sprinkle a little sugar on top of the glaze if you like them sweeter.

Place the scones in the oven and bake for 10-13 minutes until they're risen and the tops are golden brown. Transfer to a wire rack to cool, but only slightly, they're very good eaten still warm.


Variations

Fruit Scones - add 100g of any dried fruit to the dry flour mixture before adding the egg and milk. I used raisins in this batch.

Cinnamon - add to taste (I use about 2.5 tsp) of cinnamon when sifting the flour.

Chocolate - add 100g of chopped chocolate to the dry ingredients. I'm personally not a fan of chocolate in these, but everyone else I make them for seems to love them, so ......

Cheese - omit the sugar and add 100g of good strong cheddar to the dry ingredients or a red cheese is lovely too.


Enjoy!

Friday, 11 December 2009

Meringue Christmas Tree Cookies

Well they're not really cookies as such, but you can pick them up with one hand and eat them so 'cookies' will do for me.

Start off by preheating the oven to 100C (80C for fan assisted) and beat four egg whites until stiff peaks form. I used a stand mixer but you could use an electric whisk or even do it by hand if you're feeling energetic.

Once the eggs are stiffly beaten, whisk in 250g caster sugar and beat until the meringue is glossy.

Next put the meringue mixture into a piping bag (it really is easier to do these in a piping bag rather than trying to spoon it onto the tray and make a tree shape).


Line a baking sheet with parchment paper or silpat and pipe Christmas tree shapes by zigzagging back and forth.


You can pipe these really close together because meringues don't spread.

Now pop the tray in the oven and basically forget about them for two hours. It doesn't really matter what size you make the trees, it'll still take about two hours.


Once they're ready take the tray out of the oven and lift the trees straight off to cool down. They actually only take about ten minutes to cool so you can spend the time getting your decorations together.

Yes, there is a sneaky snowman up in the top left corner:)


We used blue and pink icing 'tinsel' on our trees, but you could use anything really. Dip them in chocolate (but wait til it cools a fair bit), cover in sprinkles add a shake of edible glitter or sandwich two together with fresh cream and strawberry jam in the middle, anything goes really with meringue.


And enjoy them.

With 20/20 hindsight, I should have been making these all year. You can freeze them undecorated, they keep for months and months in the freezer and they're a great way to use up any eggs that are close to their best before date because old eggs make better meringue than fresh.

I should plan ahead more next year.

Sunday, 27 September 2009

Raspberry and Coconut Breakfast Bars

My poor husband has been badly in need of a breakfast now that the cooler mornings are rolling in, but unfortunately he's just not the kind of person that can stomach eating at 7.00am.

So I needed something that I could send him out the door with in the morning, something that would hold together well in a lunchbox and more importantly something that I could throw together once or twice a week and not have to worry about sorting something out from scratch each morning.

These breakfast bars are perfect for the job.


They hold together perfectly and because they're dense and almost a little fudgy you don't need much to send you on your way during the day. They're not too sweet either which is perfect for my husband because he doesn't have much of a sweet tooth.

They're also the simplest and quickest bars ever to throw together and they keep really well in an airtight container.

You will need;

4 cups of rolled porridge oats, the quick cook variety.
1 cup coconut (I used dessicated and shredded is fine too)
1 cup dark brown sugar
1 tsp salt
1 cup melted butter
1 cup warm jam (in this case raspberry)

Preheat your oven to 180C (350F or 160C fan assisted).

I measured out my butter and jam into a microwaveable dish and heated it for a minute to melt everything. I keep my jam in the fridge, but if you don't then you don't really need to worry about warming it, as long as you can mix it into the oats.

Put all the ingredients into a large bowl and mix until completely combined. This doesn't take long at all.

Press the mixture into a well greased (and lined if you prefer) 9 x 13 inch pan (10 x 12, a couple of 8 x 8's whatever you happen to have on hand) and bake in the preheated oven for 25 minutes.

Remove the pan from the oven, the bars will be golden in colour and the jammy bits will have darkened slightly. Allow the bars to cool in the pan for 20-30 minutes before turning out and cutting with a sharp knife. I cut this batch into 15 bars, although I think cutting into 18 will still give a good sized bar. One of these is plenty for Chloe and I although Robert will happily munch through two at a time.

One the bars are completely cool, store them in an airtight container and use for breakfasts and lunches through the week, repeat as necessary.


I've tried these so far with raspberry jam and orange marmalade and both work really well. I think blackberry or bramble jelly would also work really well in these bars although if were to use strawberry I may cut the sugar down to 2/3 or 3/4 cup to help balance the sweetness.

Saturday, 26 September 2009

Gingerbread with Lemon Icing

You just have to have gingerbread at this time of year, don't you? Now I'm talking about gingerbread cake here rather than gingerbread biscuits.

The cake is very easy to make, although I will admit that it does leave a few more dirty dishes than my usual cakes (ie one bowl and a cake tin), for this one you will also need a good heavy pot, you can do it with a lighter one too, but you will have to stand over it and stir constantly to avoid it catching on the bottom.

For this cake you will need;

150g butter
125g dark brown sugar
200g golden syrup
200g treacle (don't worry if these two aren't exact, its near impossible to weigh while pouring it from the tin)
1tsp grated fresh ginger
1tsp ground ginger (dried)
2tsp ground cinnamon
250ml milk
2 eggs, beaten
1tsp bicarbonate of soda
300g plain flour

Preheat your oven to 170C (150C for fan assisted).

Sieve the plain flour and bicarb into a large bowl;


Put the butter, sugar, syrup, treacle and spices into your heaviest pot and melt over a low/medium heat, stirring to make sure the sugars don't catch on the bottom of the pot, if they do catch dump it and start again because the finished cake will just taste burnt even from the smallest catch.


Once melted, remove from the heat for a minute or two. It should look thick and glossy, like melted chocolate;


Add the milk to the sugar mixture first to cool it and then add the beaten eggs, while stirring.


Then just pour this mixture into the bowl along with the flour and bicarb and mix well to combine. Pour the mixture into a well greased (and lined if you prefer) large cake tin. The one pictured below is a 12 inch tin.


Put the cake immediately into the preheated oven and bake for 45 minutes to 1 hour. Test the cake after 45 minutes. It will be ready when moist crumbs stick to the skewer when testing. It is a very moist cake. Invert the cake out onto a wire rack to cool.


I always use wooden skewers, so you may have less sticking to a metal skewer but the crumbs should look something like this.


Once the cake has completely cooled, mix up a quick batch of lemon icing using;

200g icing sugar
1-2tbls lemon juice

make an incredibly light and free flowing icing sugar which accepts a little more liquid than other brands like McKinney's or Tate & Lyle which are a often a lot more compacted (and in my mind already contain a little moisture because they're packed in paper rather than plastic). Start off by adding just 1 tablespoon, you want the icing quite thick but still spreadable, add as much as another tablespoon of lemon juice if needed. I find it depends on the brand, SilverspoonSilverspoon is always my very first choice when it comes to baking for all sugars.

Spread the lemon icing across the top of the cake and (if you can contain yourself) although to set somewhat before serving.


**Update - Since baking this cake I have baked it again, except this time I divided the batter into two 1 pound loaf tins and baked them for 35-40 minutes. I didn't ice the cakes and instead served them thickly sliced and spread with good butter. I really enjoyed the gingerbread loaves as did the rest of the family and I'll be making them this way a lot more often, perhaps with a little less milk and a little bit of grated raw apples added to the batter. I'll let you know how that one works out.

Monday, 3 August 2009

Coffee Cupcakes

This is my daughter's favourite cake in the whole world. When the weather is miserable, as it is today we make cake and these are her first choice each and every time.

I should start off by explaining that I recently realised that in the US a coffee cake is a cake eaten with coffee and that it could be a plain sponge cake, a flavoured cake such as cinnamon flop or even something like crumb cake whereas here in the UK a coffee cake is a cake flavoured with coffee traditionally a sandwich cake with coffee flavoured butter cream and topped with chocolate vermicelli.

These cupcakes are a variation of that recipe


Preheat oven to 180C (350F) and gather your ingredients;

Start off with a two egg simple sponge recipe, weigh the eggs and add the same weight of sugar, butter and self raising flour. Add to that 1 tbls espresso or any strong coffee and 1/2 tsp baking powder.


Put all of the ingredients together in a large bowl and beat for a few minutes until pale and fluffy.


Line a muffin tin and divide the batter between 12 liners then bake the cupcakes for 20 minutes.


Transfer the cupcakes to a wire rack and leave to cool completely before frosting.


Place 3 oz butter and 6 oz icing sugar in a large bowl and beat until creamy, add to that 1 tsp strong coffee and beat again until well combined.


Top the cupcakes with the frosting in which ever way you find easiest. I tend to put it in a bag and pipe it on, or if you prefer you can spoon it on or turn the cupcakes upside down and dip them in the frosting.


I topped these cupcakes with chocolate curls instead of the chocolate vermicelli because I just like the look of the little curls on top.


And this would be a 4 year old sized bite, rather than a mummy sized bite.


Sunday, 19 July 2009

The Ultimate Chocolate Brownies

No frills, spills, faff or frosting just deep, dark, fudgy, chocolate goodness.

Now, I'm not actually allowed to make brownies any more unless I make enough to go around so this recipe makes a lot of brownies but its pretty easy to cut the recipe down if you're trying to be good. Honestly though, I would and probably could eat this entire batch myself. I'm not saying I'm going, just that I could. Besides if you're going to fall off the wagon anyway, sure you might as well jump.

Start off by preheating your oven to 180C (350F) or 160C if your oven is fan assisted, then gather together your ingredients.

375g dark chocolate
375g butter (unsalted if you have it but if you don't just omit the salt in this recipe)
500g caster sugar
6 large eggs
1 tablespoon vanilla extract
225g plain flour
1 teaspoon of salt (only if using unsalted butter)

Start by putting the butter and chocolate into a heavy based pan and put over a low heat to start melting.


Like so...


While that gets going put the sugar, eggs and vanilla into a large bowl (bigger than the one I started with).


Beat the sugar, eggs and vanilla until combined but you don't need to go light and fluffy with brownies just make sure its all mixed together.


Your chocolate and butter should be pretty much melted by now. I tend to turn off the heat when there are still a few lumps and just swirl it in the pan until they melt. Allow the chocolate and butter to cool slightly, it doesn't exactly need to be cold or even room temperature, just bear in mind that if its too hot you will cook the eggs and you don't want to do that.

Once the chocolate has cooled a little start by drizzling the melted chocolate mixture into the egg mixture whilst whisking the eggs, once you've added about half the chocolate this way you can start to just glug it in there, but still keep whisking.


Next add your flour and salt (if using) and use the whisk again to get it mixed in. Brownies aren't like muffins you do need to make sure the mixture is smooth.


Now for the pan. We like our brownies tall around here so I use a 10 x10 inch pan for them, although for regular depth brownies stick to the 13 x 9 inch pan. Line the pan first with foil or parchment paper and then pour the brownie batter into the pan.


brownies and 40 minutes for If you use the 10 x 13 inch pan bake the brownies for 25 - 40 minutes. I know that sounds like a huge gap in times but 25 minutes will give you gooey brownies, 30-35 minutes for fudgycakey brownies, to each there own and all that.

Because I used the 10 x 10 my brownies took 1 hr 10 mins for fudgy, shave about 10-15 off this for gooey and add the same amount of time for cakey ones. See, simple as!


Let the brownies cool in the pan (I know) for about half an hour before turning them out. If you went for gooey brownies I would suggest leaving them to cool completely in the pan as there's a certain amount of "setting" involved in the really gooey ones and you don't want to risk them falling apart, or worse still a steam burn while trying to get them out of the pan.

Once the brownies have cooled, cut them into as many pieces as you like, bite sized pieces, big flat slabs whatever takes your fancy.


Dust them with a little icing sugar to get across the idea of the craggy surface on top in the photographs although the icing sugar is completely unnecessary:)


Open mouth, cram in entire brownie, lather, rinse, repeat.

Enjoy!

Sunday, 12 July 2009

My Victoria Sandwich Cake

I love a bit of Victoria sandwich cake. Nothing too fancy or over the top, plastered in frosting or sprinkles. Just a slice of nice traditional cake.

First gather your ingredients together and preheat the oven to 180C (350F).

I used my simple sponge recipe for this cake.

I started with four eggs for a 8inch layer cake. The four eggs weighed 250grams exactly which almost never happens, but makes me very happy so I weighed out 250grams of butter, caster sugar and self raising flour.

Place all four ingredients into a large bowl and add one teaspoon of baking powder and one tablespoon of lemon juice which helps to break down the gluten in the flour and make the sponge lighter.


Using an electric hand whisk, beat the the ingredients until pale and fluffy which should take five minutes or so.


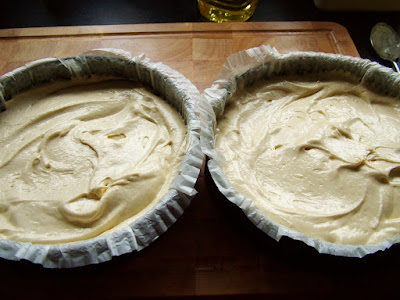
Divide the batter between two greased and lined 8 inch cake tins and bake for 25 - 30 minutes. Test the cakes by inserting a skewer into the centre of the cake, it should come out clean or with a couple of moist crumbs but not batter.


Allow the cakes to stand in the tins for a few minutes before turning out onto a wire rack and leaving to cool completely.


Once the cakes have cooled completely its time to assemble the cake.

Start by choosing which of the two cakes you like the look of best although it doesn't really matter, this is a plain snacking cake and not a fancy display piece, but still.

Take the other layer and place upside down on a cake plate (or just with the smoothest side facing up).


Now here's the thing. I like a bit of butter cream in my Victoria Sandwich but for a lot of people this would be complete sacrilege punishable by death.

But I'm hoping that the people who do know where I live, love me enough not to attack me on a dark alley on the way home over a bit of butter cream so I'm going to go ahead and add it. If you really can't stand the thought then by all means leave it out and skip straight to the fruit.


Spread on a good layer of strawberry or raspberry jam or by all means use fresh crushed fruit. You don't want the layer of jam to be too thick or the top layer will skite about all over the place when you try to cut it.


Then pop on the top layer and give it a little dusting of caster sugar, not icing sugar. It's the one thing I'm strict about.

And you're all done.


Well, nearly all done.


There you go. Now you're all done!


That's a mummy sized bite for anyone interested.