skip to main |
skip to sidebar
This is a really quick and easy food processor recipe, but it does mean that I have naff all in the way of "in progress" photos:) IngredientsPreheat oven to 180C (350F)Base2 cups plain flour1 cup cold butter, in smallish pieces1/2 cup icing sugar1/2 cup coconut - flaked or desiccatedLemon Layer1/4 cup plain flour2 cups white caster sugar4 large eggs1/2 cup fresh lemon juice1 teaspoon baking powderGreased and lined 13 x 9 x 2 baking panPlace all the ingredients for the base into the food processor and process until it looks like wet sand. Press the crumb mixture into the base of the pan and bake for 15-20 minutes until the edges are golden brown.While the base is baking in the oven, put all ingredients for the lemon layer into the food processor and blend for two or three minutes until well combined and to let the sugar begin to dissolve into the eggs and lemon.Pour the lemon mixture over the base while it's still hot and bake again for 20-25 minutes until the surface of the lemon mixture is crisp and golden. It's easier to do the pouring if you just leave the baking pan in the oven and slide the shelf it's sitting on out of the oven slightly to make it easier to get at, rather than try to carry it back to the oven full of liquid.Once baked remove the baking pan from the oven and place on a wire rack, then leave the squares in the pan until complete cool and cut into squares ready to serve.
 The lemony layer is very like a firm set lemon curd with a very light and crispy topping.Enjoy
Most of the time I'll admit that when I head into the kitchen to bake something, my only purpose in doing so it to make sure there is something good in the house to eat or to occupy an easily bored four year old. On those occasions I break out the old faithful recipes, the all in one variety which results in a delicious cake or treat without too much effort on my part.However, I do really love to bake and when the notion takes me and I find myself with an abundance of free time on my hands, second on my list of" must makes" are scones (beaten from the top spot by bread). Scones are one of my all time favourite things to bake. There's something very comforting in the familiarity and old fashionedness of scones. I make them, just as I was taught, with my hands.
  The recipe for a basic scone dough is simple enough and you'll likely have all the ingredients handy. I think this may be a WI recipe, as it is, I found it scribbled in a notebook which belonged to my mother in law.Ingredients500g plain flour1 heaped tsp bicarb2 tsp cream of tartar125g cold butter, cut into cubes or dipped in flour and grated a la Delia35g caster sugar1 large beaten egg (reserve one tblsp)250ml milkGlaze1 tblsp reserved beaten egg and 1 tblsp milk combinedOven Temp220C (425F)Start by preheating your oven. Sift the flour, bicarb and cream of tartar into a large bowl.Add the cubed or grated butter to the flour mixture and rub in gently with the fingertips, giving the bowl a quick shake every now and then to raise any lumps of butter to the surface. Once the butter is completely rubbed into the flour (it will have a sandy consistency) stir in the caster sugar. Next add the beaten egg (remembering to reserve one tablespoon) to the milk, mix to combine and add the milk and egg to the flour mixture in the bowl. Using a blunt knife or palette knife, quickly mix the wet ingredients into the dry.The dough will be very soft and ever so slightly sticky, but you should still be able to handle it if you move quickly.Turn the dough out onto a well floured counter top. Flour the palms of your hands or dust the surface of the dough with a little flour and pat it down until your dough it about 2 cm thick.Flour a 2.5 inch cutter and cut out the scones. You can very gently press the offcuts of this dough together to cut a second batch of scones. I usually get about 20 scones from this recipe.Place the scones about 2 inches apart on a floured cookie sheet and brush the tops with the glaze. You can also sprinkle a little sugar on top of the glaze if you like them sweeter.Place the scones in the oven and bake for 10-13 minutes until they're risen and the tops are golden brown. Transfer to a wire rack to cool, but only slightly, they're very good eaten still warm.
 VariationsFruit Scones - add 100g of any dried fruit to the dry flour mixture before adding the egg and milk. I used raisins in this batch.Cinnamon - add to taste (I use about 2.5 tsp) of cinnamon when sifting the flour.Chocolate - add 100g of chopped chocolate to the dry ingredients. I'm personally not a fan of chocolate in these, but everyone else I make them for seems to love them, so ......Cheese - omit the sugar and add 100g of good strong cheddar to the dry ingredients or a red cheese is lovely too.
 Enjoy!
Because when you think about it you can always whip this up, pull the curtains, turn on the travel channel and pretend the sun is shining.Pavlova is pretty easy to make. If you've tried before without success though chances are you need to up the amount of sugar in the recipe and always remember to leave the pavlova in the oven to cool, yes it takes ages, but it just isn't the same otherwise.Start off by preheating your oven to 180C and lining a baking sheet with either parchment paper or a sheet of silpat, whichever you have handy. Foil, greaseproof paper or just greasing the tray don't work very well for pavlova. I use a large round pizza sheet for mine, but nobody ever said pavlova had to be round so if all you have is a regular square or rectangular sheet, go with that.Next gather your ingredients together. You will need;4 large egg whites250g caster sugar (you can use unrefined caster which adds a slight caramel taste)2 tsp cornflour1 tsp white vinegar1/2 tsp vanilla extracta carton of double or whipping cream (I know that's a bit obscure but whatever happens to be available in roughly a half pint carton will do the trick)fruit to top (in this case strawberry)Now, I haven't taken photos of every step because it would just look like a load of photos of a bowl of white fluff...Start off with just the egg white in a clean bowl. It really needs to be clean and free of any oil, to be sure pour a little lemon juice or white vinegar onto a clean cloth or paper towel and wipe the inside of the bowl.Beat the egg white on high speed until they are stiff, you can test them by tipping the bowl upside down over your head if you like.Next, with the egg whites still beating, add the sugar about a quarter at a time.This is where it's handy to have a big mixer. Walk away. Yep, that's right walk away and leave it beating. Its quite easy to assume that once the sugar is incorporated into the egg white that it's finished, but you need to leave it beating until you can take a pinch of the mixture between your fingers, rub it and not feel any sugar. Trust me if you try to stand there and watch the machine, you'll get bored, impatient and end up moving on too quickly.Once all the sugar has dissolved into the egg whites, add the cornflour, vinegar and vanilla and beat it again for another minute.Once you've done all that, the mixture will look soft and shiny. Next take your lined tray and pile the pavlova mixture into the centre then spread it out into a rough circle. You don't have to be particularly delicate with pavlova in the way that you do with a souffle, just make sure to leave a couple of inches around the outside of the pavlova because these things can grow a fair bit in the oven.Place the pavlova in the preheated oven and as soon as you close the door, turn the temperature down to 150C. Bake the pavlova at 150c for 1 hour 15 minutes. Once the pavlova is baked, turn the oven on, leave the door closed and walk away.
 See what I mean about growing. After a couple of hours the pavlova should be cool (or very nearly at least) and you can remove it from the oven.
  To serve invert the pavlova onto a plate. This way you have the light crispy shell on the bottom and outside edges, a bit like a pie shell, but the soft, chewy, mallow bit is in the middle. You can see from the photo below that once you have inverted the pavlova there is usually a crater in what is now the top.
 Which is perfect for filling with whipped cream and strawberries.
 I usually don't bother to sweeten the cream, but you can do so easily enough by adding a teaspoon or two of icing sugar when you're whipping the cream.
 A couple of good variations for pavlova are;Mashed bananas beaten into the whipped cream, pile it in the centre and top with chopped nuts and finally drizzle with melted dark chocolate. The good thing about this one is that it will cost you about the same amount of money to make all year round whereas a punnet of (crap, spongy, tasteless) strawberries in winter can set you back as much as £10.You can also replace the caster sugar with golden caster and add 2 tbls of treacle to the pavlova mixture before baking. Once cooled, top the pavlova with hot chopped apples sauteed in a little butter, brown sugar and cinnamon before drizzling with cold cream for another gorgeous winter dessert that tastes a little bit like the toffee apples your granny used to make, but you haven't quite managed the knack of yet.
These bars were inspired by MTM's recipe for Scotch Squares. You should definitely give the original recipe a try as well as this one. My only real reason for fiddling with the recipe at all was because a) the hubs likes to grab one of these for breakfast in the morning and he has something against eating chocolate for breakfast (yes you heard me right MTM has chocolate in her recipe, but if you go there now without reading this one first I'll know) and b) I originally made them with crushed raspberries just because I had a mountain of them in the freezer after a mammoth berry picking session.Firstly you'll need to preheat your oven to 180C (350F and gather together your ingredients which are;1 cup melted butter1/2 brown sugar (I tend to cut this down to about 1/4 cup)1/2 cup caster sugar1/2 tsp almond extract1 cup plain flour2 1/2 cups of rolled oats (the regular porridge oat variety are perfect)1 1/2 tsp baking powdergrated zest of one lemon1/2 cup of good raspberry jamReserve half a cup of oats and set to one side along with the raspberry jam.Place all remaining ingredients into a large bowl and combine using a spoon or spatula. You don't need an electric beater for this as it's very light and quick work. Once you have all of ingredients combined, take half a cup of the mixture and put in a separate bowl along with the reserved half cup of rolled oats and use a fork or your hands to combine. This will give you a crumblier mixture than the first.
 Place the original oat mixture into a lined and greased 9 X13 pan (mine is actually about 8 X 12 but it all comes out in the wash) .
 Press the oat mixture down quite firmly, making sure the mixture is pretty even and the corners are well filled (they're the best bit).
 Next take the half cup of raspberry jam and spread it over the surface of the oat mixture. If, like me, you keep your jam in the fridge then stick it in the microwave for 10-15 seconds to loosen it up.
 Once the jam has been spread out, take the bowl of crumbly oat mixture and sprinkle it over the top of the jam. This actually works out easier to do if you grab a handful at a time and rub it between the palms of your hands over the top of the pan. It gives a more even coating that way.You'll notice that I've also sprinkled over a few tbls of coconut just because I can't stop myself from adding coconut to everything at the minute. You don't need to add this and this was my first attempt at adding it in there, but it did turn out pretty damn good.
 Then place the pan into your preheated oven and bake for 30 minutes until golden brown and the jam has deepened in colour.
 Remove the pan from the oven and leave to cool for about 20 minutes in the pan before scoring into roughly 2 inch squares. Leave (if you can) to cool completely in the pan before serving.
 These bars are lovely, light and a little crumbly but they do stand up quite well to the lunch box test.I may try replacing a small amount of the sugar with golden syrup next time which would make for a sturdier bar and if I have any success with this I'll let you know.I'd be pretty confident that these would be just as good using strawberry jam or apple sauce in place of the raspberry, or even (nominess) bramble jelly, oh I wish I'd had bramble jelly. Next time!I'd love to hear any other variations on this recipe that have worked for you. Its such a good base for just about anything.Thanks MTM for the original inspiration.
I love a bit of Victoria sandwich cake. Nothing too fancy or over the top, plastered in frosting or sprinkles. Just a slice of nice traditional cake.First gather your ingredients together and preheat the oven to 180C (350F).I used my simple sponge recipe for this cake.I started with four eggs for a 8inch layer cake. The four eggs weighed 250grams exactly which almost never happens, but makes me very happy so I weighed out 250grams of butter, caster sugar and self raising flour.Place all four ingredients into a large bowl and add one teaspoon of baking powder and one tablespoon of lemon juice which helps to break down the gluten in the flour and make the sponge lighter. Using an electric hand whisk, beat the the ingredients until pale and fluffy which should take five minutes or so.
 Divide the batter between two greased and lined 8 inch cake tins and bake for 25 - 30 minutes. Test the cakes by inserting a skewer into the centre of the cake, it should come out clean or with a couple of moist crumbs but not batter.
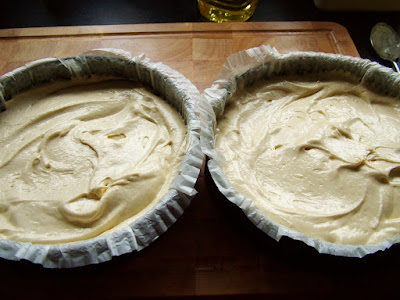 Allow the cakes to stand in the tins for a few minutes before turning out onto a wire rack and leaving to cool completely.
 Once the cakes have cooled completely its time to assemble the cake.Start by choosing which of the two cakes you like the look of best although it doesn't really matter, this is a plain snacking cake and not a fancy display piece, but still.Take the other layer and place upside down on a cake plate (or just with the smoothest side facing up).
 Now here's the thing. I like a bit of butter cream in my Victoria Sandwich but for a lot of people this would be complete sacrilege punishable by death.But I'm hoping that the people who do know where I live, love me enough not to attack me on a dark alley on the way home over a bit of butter cream so I'm going to go ahead and add it. If you really can't stand the thought then by all means leave it out and skip straight to the fruit.
 Spread on a good layer of strawberry or raspberry jam or by all means use fresh crushed fruit. You don't want the layer of jam to be too thick or the top layer will skite about all over the place when you try to cut it.
 Then pop on the top layer and give it a little dusting of caster sugar, not icing sugar. It's the one thing I'm strict about.And you're all done.
 Well, nearly all done.
 There you go. Now you're all done!
 That's a mummy sized bite for anyone interested.
We realised this week that out rhubarb had come in. We planted a single rhubarb plant about five years ago now and every year we strip the plant twice and use it for rhubarb crumble. If you like rhubarb, you should really consider getting a plant. It doesn't take up a huge amount of room, it looks quite nice in the garden because of the colour and the huge leaves and it'll pretty grow on a brick wall. Well maybe that's a slight exaggeration, but it is hardy, our plant is in a bit of a boggy corner which doesn't get a huge amount of sunlight and still the plant does well.
Rhubarb is related to celery. It is a bit of an acquired taste, but its very good for you. Personally I can just sit down with a couple of raw stalks and a bowl of sugar, dipping it in and chewing away happily on it, but you may prefer to cook it first.
Firstly, you'll need to remove the very bottom of the stalks along with the leaves and wash the stalks. If the rhubarb was picked a day or two before using you may also want to string it, which just means to peel it. A potato or speed peeler will make it very easy to do.
Would you just look at the mountain of leaves. It does seem a bit wasteful to grow a plant and only be able to eat around a quarter of what it produces, but you can compost the leaves. There's a old wives tales floating around that the leaves will stop or slow the rest the compost but its a load of rubbish. You may want to shred them a bit first because they are huge.
 And of course, because the rhubarb came from the garden I wasn't surprised to find a little stow away.
 Start by chopping the rhubarb into roughly the same size pieces. I cut the thicker stalks into one inch pieces and the thinner ones were one and a half to two inches long.
Once the rhubarb is chopped, throw it in a roasting pan and add around five or six tablespoons of sugar to the pieces before drizzling with about the same quantity of water. Then bake at 180C (350F) for 15-20 minutes. You just want the rhubarb to be fork tender.
While the rhubarb is in the oven, you can make the crumble. I used 8oz of flour for mine because I was using a large dish, but a regular 8-10 inch pie dish will only need 6oz flour.
Just remember that crumble is always half the fat to flour with the same amount of sugar to fat added. So mine was;
8oz plain flour
4oz margarine
4oz sugar
Starting with a knife, cut the fat into the flour and sugar.
Then rub the fat in until you're left with a crumbly mixture resembling large breadcrumbs.
Once the rhubarb is tender, remove it from the oven, it will be nice a glossy and should also be a bit pinker. The rhubarb should still be holding it's shape.
Using a slotted spoon, pile the rhubarb into a pie dish or casserole dish.
Then cover with the crumble and press down slightly, leaving a few rough patches and continue baking at 180C (350F) for 30 to 40 minutes.
The juice from the rhubarb will bubble over the top of the crumbly and become sticky and jammy in the heat.
Serve warm with cold cream or at room temperature with hot or cold custard.
Crumbles are a good way to use up any glut of fruit although you won't need to add extra sugar or pre-bake softer fruits such as berries, eating apples, pears, peaches or plums.
Forget Nigella's "throw chocolate in and people will buy it" attitude. This is the original and best (IMHO) Guinness Cake.
8oz softened butter
8oz dark brown sugar
4 large eggs
10oz plain flour, sifted
1-2 teaspoons ground mixed spice
8oz each of raisins and sultanas
4oz chopped glace cherries
4 oz chopped mixed peel
4 oz chopped walnuts
1/4 pint Guinness
Cream the butter and sugar together until creamy.
Beat in eggs one at a time.
Fold in the flour, mixed spice, fruit, nuts and peel and 4 tablespoons of Guinness.
Pour into a greased and lined 8inch cake tin and bake at 160C (325F) for one hour, reduce oven temperature to 150C (300F) and bake for another 1.5 hours.
Cool in the pan and then turn out onto a flat surface.
Prick the base of the cake and feed with the remaining Guinness.
Store in an airtight container for at least 10 days before eating. It produces a dense, moist fruit cake.
A good recipe to make a couple of weeks before Christmas to serve to guests.


