skip to main |
skip to sidebar
This is a really quick and easy food processor recipe, but it does mean that I have naff all in the way of "in progress" photos:) IngredientsPreheat oven to 180C (350F)Base2 cups plain flour1 cup cold butter, in smallish pieces1/2 cup icing sugar1/2 cup coconut - flaked or desiccatedLemon Layer1/4 cup plain flour2 cups white caster sugar4 large eggs1/2 cup fresh lemon juice1 teaspoon baking powderGreased and lined 13 x 9 x 2 baking panPlace all the ingredients for the base into the food processor and process until it looks like wet sand. Press the crumb mixture into the base of the pan and bake for 15-20 minutes until the edges are golden brown.While the base is baking in the oven, put all ingredients for the lemon layer into the food processor and blend for two or three minutes until well combined and to let the sugar begin to dissolve into the eggs and lemon.Pour the lemon mixture over the base while it's still hot and bake again for 20-25 minutes until the surface of the lemon mixture is crisp and golden. It's easier to do the pouring if you just leave the baking pan in the oven and slide the shelf it's sitting on out of the oven slightly to make it easier to get at, rather than try to carry it back to the oven full of liquid.Once baked remove the baking pan from the oven and place on a wire rack, then leave the squares in the pan until complete cool and cut into squares ready to serve.
 The lemony layer is very like a firm set lemon curd with a very light and crispy topping.Enjoy
Because when you think about it you can always whip this up, pull the curtains, turn on the travel channel and pretend the sun is shining.Pavlova is pretty easy to make. If you've tried before without success though chances are you need to up the amount of sugar in the recipe and always remember to leave the pavlova in the oven to cool, yes it takes ages, but it just isn't the same otherwise.Start off by preheating your oven to 180C and lining a baking sheet with either parchment paper or a sheet of silpat, whichever you have handy. Foil, greaseproof paper or just greasing the tray don't work very well for pavlova. I use a large round pizza sheet for mine, but nobody ever said pavlova had to be round so if all you have is a regular square or rectangular sheet, go with that.Next gather your ingredients together. You will need;4 large egg whites250g caster sugar (you can use unrefined caster which adds a slight caramel taste)2 tsp cornflour1 tsp white vinegar1/2 tsp vanilla extracta carton of double or whipping cream (I know that's a bit obscure but whatever happens to be available in roughly a half pint carton will do the trick)fruit to top (in this case strawberry)Now, I haven't taken photos of every step because it would just look like a load of photos of a bowl of white fluff...Start off with just the egg white in a clean bowl. It really needs to be clean and free of any oil, to be sure pour a little lemon juice or white vinegar onto a clean cloth or paper towel and wipe the inside of the bowl.Beat the egg white on high speed until they are stiff, you can test them by tipping the bowl upside down over your head if you like.Next, with the egg whites still beating, add the sugar about a quarter at a time.This is where it's handy to have a big mixer. Walk away. Yep, that's right walk away and leave it beating. Its quite easy to assume that once the sugar is incorporated into the egg white that it's finished, but you need to leave it beating until you can take a pinch of the mixture between your fingers, rub it and not feel any sugar. Trust me if you try to stand there and watch the machine, you'll get bored, impatient and end up moving on too quickly.Once all the sugar has dissolved into the egg whites, add the cornflour, vinegar and vanilla and beat it again for another minute.Once you've done all that, the mixture will look soft and shiny. Next take your lined tray and pile the pavlova mixture into the centre then spread it out into a rough circle. You don't have to be particularly delicate with pavlova in the way that you do with a souffle, just make sure to leave a couple of inches around the outside of the pavlova because these things can grow a fair bit in the oven.Place the pavlova in the preheated oven and as soon as you close the door, turn the temperature down to 150C. Bake the pavlova at 150c for 1 hour 15 minutes. Once the pavlova is baked, turn the oven on, leave the door closed and walk away.
 See what I mean about growing. After a couple of hours the pavlova should be cool (or very nearly at least) and you can remove it from the oven.
  To serve invert the pavlova onto a plate. This way you have the light crispy shell on the bottom and outside edges, a bit like a pie shell, but the soft, chewy, mallow bit is in the middle. You can see from the photo below that once you have inverted the pavlova there is usually a crater in what is now the top.
 Which is perfect for filling with whipped cream and strawberries.
 I usually don't bother to sweeten the cream, but you can do so easily enough by adding a teaspoon or two of icing sugar when you're whipping the cream.
 A couple of good variations for pavlova are;Mashed bananas beaten into the whipped cream, pile it in the centre and top with chopped nuts and finally drizzle with melted dark chocolate. The good thing about this one is that it will cost you about the same amount of money to make all year round whereas a punnet of (crap, spongy, tasteless) strawberries in winter can set you back as much as £10.You can also replace the caster sugar with golden caster and add 2 tbls of treacle to the pavlova mixture before baking. Once cooled, top the pavlova with hot chopped apples sauteed in a little butter, brown sugar and cinnamon before drizzling with cold cream for another gorgeous winter dessert that tastes a little bit like the toffee apples your granny used to make, but you haven't quite managed the knack of yet.
I love a bit of Victoria sandwich cake. Nothing too fancy or over the top, plastered in frosting or sprinkles. Just a slice of nice traditional cake.First gather your ingredients together and preheat the oven to 180C (350F).I used my simple sponge recipe for this cake.I started with four eggs for a 8inch layer cake. The four eggs weighed 250grams exactly which almost never happens, but makes me very happy so I weighed out 250grams of butter, caster sugar and self raising flour.Place all four ingredients into a large bowl and add one teaspoon of baking powder and one tablespoon of lemon juice which helps to break down the gluten in the flour and make the sponge lighter. Using an electric hand whisk, beat the the ingredients until pale and fluffy which should take five minutes or so.
 Divide the batter between two greased and lined 8 inch cake tins and bake for 25 - 30 minutes. Test the cakes by inserting a skewer into the centre of the cake, it should come out clean or with a couple of moist crumbs but not batter.
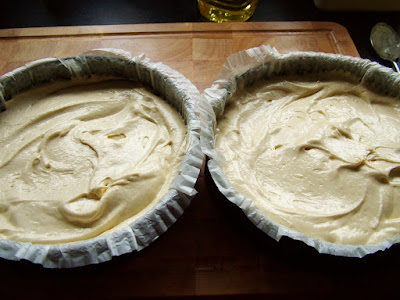 Allow the cakes to stand in the tins for a few minutes before turning out onto a wire rack and leaving to cool completely.
 Once the cakes have cooled completely its time to assemble the cake.Start by choosing which of the two cakes you like the look of best although it doesn't really matter, this is a plain snacking cake and not a fancy display piece, but still.Take the other layer and place upside down on a cake plate (or just with the smoothest side facing up).
 Now here's the thing. I like a bit of butter cream in my Victoria Sandwich but for a lot of people this would be complete sacrilege punishable by death.But I'm hoping that the people who do know where I live, love me enough not to attack me on a dark alley on the way home over a bit of butter cream so I'm going to go ahead and add it. If you really can't stand the thought then by all means leave it out and skip straight to the fruit.
 Spread on a good layer of strawberry or raspberry jam or by all means use fresh crushed fruit. You don't want the layer of jam to be too thick or the top layer will skite about all over the place when you try to cut it.
 Then pop on the top layer and give it a little dusting of caster sugar, not icing sugar. It's the one thing I'm strict about.And you're all done.
 Well, nearly all done.
 There you go. Now you're all done!
 That's a mummy sized bite for anyone interested.


